组件实例核心属性 state
上一章讲述了函数式组件与类式组件的基本使用, 并说了函数式组件定义的是简单组件, 类式组件定义的是复杂组件
那么根据什么来区分简单组件与复杂组件呢?
- 简单组件: 组件中没有状态
- 复杂组件: 组件中是有状态的
其中状态指的就是state, 可以在类式组件中打印this查看, 默认state: null
案例讲解
下面就做一个案例来进一步了解state状态
需求: 定义一个展示天气信息的组件
- 默认展示天气信息炎热或者凉爽
- 点击文字切换天气
初始化并读取状态
- 代码示例
// 1. 创建组件
class Weather extends React.Component {
  constructor(props) {
    super(props)
    // 初始化状态
    this.state = {
      isHot: true
    }
  }

  render() {
    console.log(this.state)
    // 读取状态
    const { isHot } = this.state
    return <h1 id="title">今天天气很{ isHot ? '🥵' : '🥶' }</h1>
  }
}

// 2. 渲染组件到页面
ReactDOM.render(<Weather />, document.getElementById("app"));
事件绑定
React的事件绑定可以参考原生的事件绑定, 先来看看原生事件绑定有哪些方式
原生事件绑定
原生事件绑定的三种方式
- 代码示例
<button id="btnA">按钮A</button>
<button id="btnB">按钮B</button>
<button onclick="onTapBtnC()">按钮C</button>
<script>
  // 方式一
  const btnA = document.getElementById('btnA')
  btnA.addEventListener('click', () => {
    alert('按钮 A 被点击了')
  })

  // 方式二
  const btnB = document.getElementById('btnB')
  btnB.onclick(() => {
    alert('按钮 B 被点击了')
  })

  // 方式三
  function onTapBtnC() {
    alert('按钮 C 被点击了')
  }
</script>
React 事件绑定
在React中以上原生事件绑定的三种方式都可以使用, 但是由于前两种方式需要设置id并借助于document获取DOM, 跟React声明的减少与真实DOM交互的核心思想相违背, 所以不推荐使用
因此在React中推荐使用方式三进行事件绑定
注意
React将原生的onclick事件名重写为onClickReact在渲染组件时会直接执行render中的代码, 所以在事件绑定时不能使用函数名(), 否则会直接调用函数, 然后将函数的返回值赋值给了onClick, 在点击时也就没有任何效果
- 代码示例
// 1. 创建组件
class Weather extends React.Component {
  constructor(props) {
    super(props)
    // 初始化状态
    this.state = {
      isHot: true
    }
  }

  render() {
    console.log(this.state)
    // 读取状态
    const { isHot } = this.state
    /** 事件绑定
     * 注意: 此处不要写 demo(), React 会直接执行代码并将 demo() 的返回值赋值给 onClick */
    return <h1 onClick={ demo }>今天天气很{ isHot ? '🥵' : '🥶' }</h1>
  }
}
// 2. 渲染组件到页面
ReactDOM.render(<Weather />, document.getElementById("app"));

// 事件绑定函数
function demo() {
  console.log('点击了')
}
修改状态
目前已经给组件绑定了点击事件, 下面就需要获取到state状态中isHot的值, 然后进行取反操作
上例中的demo函数放在了Weather类外部, 而state状态在Weather的内部
所以无法在demo函数内部使用this获取Weather类中的state状态, 那么将demo函数放在Weather类的内部能否通过this获取到state状态呢?
this 指向问题
- 代码示例
// 1. 创建组件
class Weather extends React.Component {
  constructor(props) {
    super(props)
    // 初始化状态
    this.state = {
      isHot: true
    }
  }

  render () {
    console.log(this.state)
    // 读取状态
    const { isHot } = this.state
    /** 事件绑定
     * 注意: 此处不要写 demo(), React 会直接执行代码并将 demo() 的返回值赋值给 onClick */
    return <h1 onClick={ this.changeWeather }>今天天气很{ isHot ? '🥵' : '🥶' }</h1>
  }

  // 类内部自定义函数打印 this
  demo() {
    console.log(this) // undefined
  }
}
// 2. 渲染组件到页面
ReactDOM.render(<Weather />, document.getElementById("app"));此时demo函数中打印this是undefined, 要想搞清楚这个问题, 先来看下类中方法this指向
类中方法 this 指向
- 代码示例
// 创建一个 Person 类
class Person {
constructor(name, age) {
this.name = name
this.age = age
}
// study 放在了 Person 类的原型对象上, 供实例使用
// 通过 Person 实例调用 study 时, study 中的 this 就是 Person 实例
study() {
console.log(this)
}
}
// 创建 Person 的实例对象
const person = new Person('Tom', 18)
// 通过实例调用 study 方法
person.study() // Person {name: 'Tom', age: 18}
/** 将实例的 study 回调赋值给 x
* 相当于在栈内存中开了一个 x 的空间指向堆内存中的 study 方法 */
const x = person.study
因此上例代码中的this指向问题就是因为demo函数作为onClick的回调, 不是通过实例调用而是直接调用的, 再加上类中方法内部默认开启了严格模式, 所以打印this就是undefined
解决 this 指向问题
bind 方法
bind方法的基本使用
- 代码示例
function demo() {
  console.log(this)
}
demo() // Window{}

/** 使用 bind 修改 demo 函数中的 this 指向
 * 注意: bind 会返回一个新函数, 新函数中的 this 就是 bind 方法传入的 this */
const x = demo.bind({ a: 1, b: 2})
x() // {a: 1, b: 2}
通过 bind 修改 this 指向
- 使用
bind传入实例的this - 将
bind返回的新函数赋值给Weather类自身的changeWeather属性 - 在组件上调用
changeWeather属性, 执行返回的新函数中的this就是当前实例
- 代码示例
// 1. 创建组件
class Weather extends React.Component {
  constructor(props) {
    super(props)
    // 初始化状态
    this.state = {
      isHot: true
    }
    // 通过 bind 修改 this 指向
    this.changeWeather = this.demo.bind(this)
  }

  render () {
    console.log(this.state)
    // 读取状态
    const { isHot } = this.state
    /** 事件绑定
     * 注意: 此处不要写 demo(), React 会直接执行代码并将 demo() 的返回值赋值给 onClick */
    return <h1 onClick={ this.changeWeather }>今天天气很{ isHot ? '🥵' : '🥶' }</h1>
  }

  /** 修改状态
   * demo 方法在 Weather 的原型对象上, 供实例使用
   * 由于 demo 方法是作为 onClick 的回调, 不是通过实例调用的, 而是直接调用
   * 类中的方法默认在局部开启了严格模式, 所以 demo 中的 this 为 undefined */
  demo() {
    console.log(this)
  }
}
// 2. 渲染组件到页面
ReactDOM.render(<Weather />, document.getElementById("app"));
setState 修改状态
setState所在原型链的位置
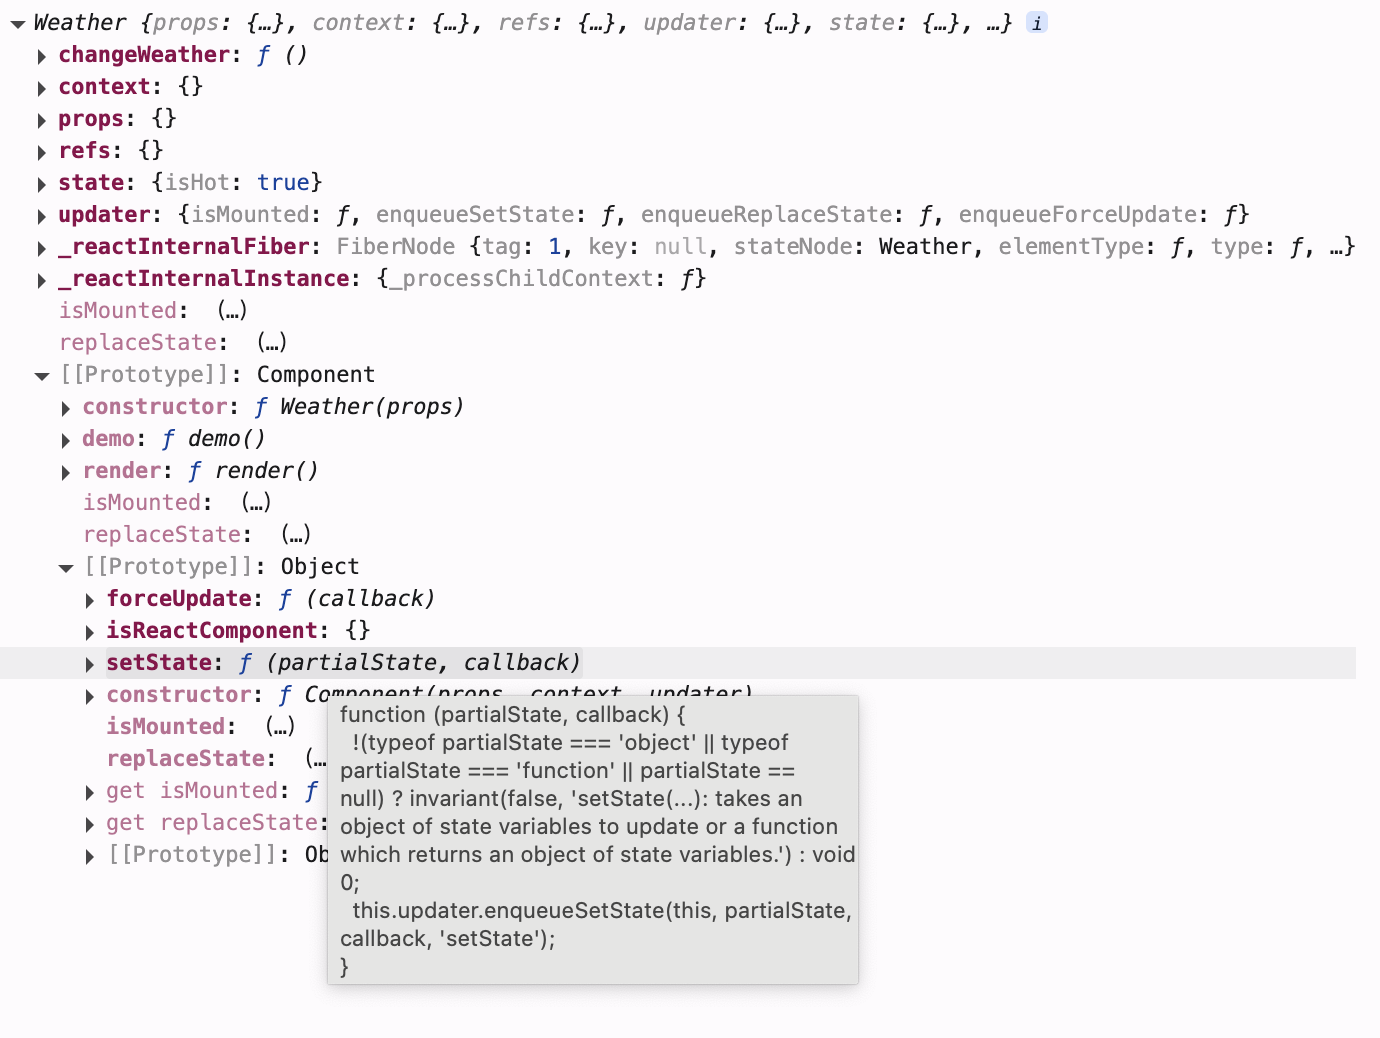
注意
state状态不能直接更改, 必须使用setState去更改setState在Weather类继承的React.Component的原型中, 可以通过this直接使用
- 代码示例
// 1. 创建组件
class Weather extends React.Component {
  constructor(props) {
    super(props)
    // 初始化状态
    this.state = {
      isHot: true
    }
    // 通过 bind 修改 this 指向
    this.changeWeather = this.demo.bind(this)
  }

  render () {
    console.log(this.state)
    // 读取状态
    const { isHot } = this.state
    /** 事件绑定
     * 注意此处不要写 demo(), React 会直接执行代码并将 demo() 的返回值赋值给 onClick */
    return <h1 onClick={ this.changeWeather }>今天天气很{ isHot ? '🥵' : '🥶' }</h1>
  }

  /** 修改状态
   * demo 方法在 Weather 的原型对象上, 供实例使用
   * 由于 demo 方法是作为 onClick 的回调, 不是通过实例调用的, 而是直接调用
   * 类中的方法默认在局部开启了严格模式, 所以 demo 中的 this 为 undefined */
  demo() {
    console.log(this) // Weather {}

    // 获取原来的 isHot 值
    const { isHot } = this.state
    /** 注意: state 状态不能直接更改, 要借助内置的 API: setState 去更改状态
     * 错误写法: this.state.isHot = !isHot */

    // ⚠️ 注意: 状态必须使用 setState 修改, 且更新是一种合并, 不是替换
    this.setState({ isHot: !isHot })
  }
}
// 2. 渲染组件到页面
ReactDOM.render(<Weather />, document.getElementById("app"));
验证 setState
- 验证
setState修改更新state状态是合并还是直接替换所有属性? - 验证
constructor,render和changeWeather的调用次数
- 代码示例
// 1. 创建组件
class Weather extends React.Component {
  // 构造器调用几次? - 1 次
  constructor(props) {
    console.log('constructor')
    super(props)
    // 初始化状态
    this.state = {
      isHot: true,
      wind: '微风'
    }
    // 通过 bind 修改 this 指向
    this.changeWeather = this.demo.bind(this)
  }

  /** render 调用几次? - 1 + n 次
   * 1 是初始化
   * n 是状态更新的次数 */
  render() {
    console.log('render')
    console.log(this.state)
    // 读取状态
    const { isHot, wind } = this.state
    /** 事件绑定
     * 注意此处不要写 demo(), React 会直接执行代码并将 demo() 的返回值赋值给 onClick */
    return <h1 onClick={ this.changeWeather }>今天天气很{ isHot ? '🥵' : '🥶' }, { wind }</h1>
  }

  // changeWeather 调用几次? - 点击几次调用几次
  demo() {
    console.log('changeWeather')
    console.log(this) // Weather {}

    // 获取原来的 isHot 值
    const { isHot } = this.state
    /** 注意: state 状态不能直接更改, 要借助内置的 API: setState 去更改状态
     * 错误写法: this.state.isHot = !isHot */

    // ⚠️ 注意: 状态必须使用 setState 修改
    this.setState({ isHot: !isHot })
  }
}
// 2. 渲染组件到页面
ReactDOM.render(<Weather />, document.getElementById("app"));
验证结果
setState更新状态是合并, 不会替换state中其他的属性- 构造器只在初始化时调用
1次 render函数调用n + 1次1: 初始化调用一次n: 状态更新次数
changeWeather调用次数跟点击次数相同
结论
正是因为state状态和setState更新状态必须结合使用, 所以说state是组件实例的核心属性
简写方式
类中添加属性
类中可以直接写赋值语句, 相当于给类的所有实例身上添加公有属性
- 代码示例
class Car {
  constructor(name, price) {
    this.name = name
    this.price = price
    // 公共属性
    // this.wheel = 4
  }
  /** 类中可以直接写赋值语句, 相当于给所以 Car 实例的身上都有 wheel 属性
   * 给 Car 的实例对象添加一个属性, 名为 wheel, 值为 4
  */
  wheel = 4
}

const carA = new Car('奔驰', '100')
const carB = new Car('宝马', '200')

console.log(carA) // Car {wheel: 4, name: '奔驰', price: '100'}
console.log(carB) // Car {wheel: 4, name: '宝马', price: '200'}
简写状态和方法
根据上例就可以将state状态和changeWeather自定义方法从构造器中拿出来, 放在类中作为公有属性使用
- 代码示例
// 1. 创建组件
class Weather extends React.Component {
  /*
  constructor(props) {
    super(props)
    this.state = { isHot: true, wind: '微风' }
    this.changeWeather = this.demo.bind(this)
  }
  */

  // 赋值语句的形式将 state 状态作为公有属性使用
  state = { isHot: true, wind: '微风' }

  render() {
    const { isHot, wind } = this.state
    return <h1 onClick={ this.changeWeather }>今天天气很{ isHot ? '🥵' : '🥶' }, { wind }</h1>
  }

  /** 赋值语句的形式将 changeWeather 作为公有属性使用
   * 使用箭头函数的形式, 函数内部会自动向外部获取 this */
  changeWeather = () => {
    console.log(this) // Weather { ... }
    const { isHot } = this.state
    this.setState({ isHot: !isHot })
  }

  /*
  demo() {
    const { isHot } = this.state
    this.setState({ isHot: !isHot })
  }
  */
}
// 2. 渲染组件到页面
ReactDOM.render(<Weather />, document.getElementById("app"));
总结
state是组件对象最重要的属性, 值是对象, 可以包含多个key: value组合
组件被称为状态机, 通过更新组件的state来更新对应的页面显示, 重写渲染组件
注意
- 组件中
render方法中的this为组件实例对象 - 组件自定义的方法中
this为undefined, 解决方式:- 强制绑定
this, 通过函数对象的bind() - 赋值语句 ➕ 箭头函数
- 强制绑定
state状态数据不能直接修改, 必须使用setState进行更新
- 最终代码示例
// 1. 创建组件
class Weather extends React.Component {
  // 初始化状态
  state = { isHot: true, wind: '微风' }

  render() {
    const { isHot, wind } = this.state
    return <h1 onClick={ this.changeWeather }>今天天气很{ isHot ? '🥵' : '🥶' }, { wind }</h1>
  }

  // 自定义方法
  changeWeather = () => {
    const { isHot } = this.state
    this.setState({ isHot: !isHot })
  }
}
// 2. 渲染组件到页面
ReactDOM.render(<Weather />, document.getElementById("app"));